Write Pretty Code snippets in your Blog with SyntaxHighlighter WP plugin [Blogging Tips]

Do you regularly write blog posts in WordPress, that contains huge number of code snippets? If yes, read on and I will show you how to make them pretty and usable with the SyntaxHighlighter plugin.

Step 1 : Download the SyntaxHighlighter WP Plugin

SyntaxHighlighter is an open-source syntax highlighter written using JavaScript. You can view the detailed information on the tool and download the source code, from the SyntaxHighlighter Google Code page.

If you are a WordPress user, then you are lucky to have a plug-in for this JavaScript tool.

Navigate to the SyntaxHighlighter Plug-in home and download it on your computer.

Step 2 : Install the SyntaxHighligher WP Plug-in

You will have to follow the regular WP Plug-in installation process. Copy all the contents of the ZIP file and upload it to the wp-content/plugins folder, on your WordPress Installation.

Step 3 : Activate the Plug-in

Once the upload is complete, you need to activate the plug-in. To do this, Navigate to the Plugins page from your WP Dashboard and click on Activate. Make sure that you get the success message for activation

Step 4 : Start writing Code Snippets in your posts

Now, when you write code snippets in your blog posts, make sure to wrap them as:

[sourcecode language='css']

your code here

[/sourcecode]

language” attribute is important and you can use one of the following alias values, depending on your code language.

Language Alias “language” code to be used
C++ cpp, c, c++
C# c#, c-sharp, csharp
CSS css
Delphi delphi, pascal
Java java
JavaScript js, jscript, javascript
PHP php
Python py, python
Ruby rb, ruby, rails, ror
SQL sql
VB vb, vb.net
XML/HTML xml, html, xhtml, xslt

Step 5 : Sample Code Snippet

Following is a sample code snippet in Ruby and how it displays up using the SyntaxHighlighter Plug-in:

#GreetMe
class GreetMe
  def initialize(name)
    @name = name
  end

  def sayhello
    puts "Hello #{@name}.  How are you?"
  end
end

Formatted with SyntaxHighlighter:

[sourcecode language='java']

#GreetMe

class GreetMe
  def initialize(name)
    @name = name
  end

  def sayhello
    puts “Hello #{@name}. How are you?”
  end
end

[/sourcecode]

Enjoy sharing your code through your WordPress Blog!

Note: If sometimes the syntax highlighter doesn’t work after performing all the installation steps, make sure your theme’s footer has `` somewhere in it, otherwise the JavaScript highlighting files won’t be loaded.

If you enjoyed reading this, consider sharing it with others using the “Share This” button at the bottom of this post.

Subscribe to more such useful posts from Thoughts Unlimited here.
How to create a Web Questionnaire Form in 5 minutes?

Have you ever tried to create a Web Questionnaire Form?  If yes, then you know the pain in creating, maintaining, sharing and gathering the results.  But Google Docs makes life easier through its Forms.  In this post, you can find out how to use Forms and create a Questionnaire is 5 minutes!

Create a Web Questionnaire Form

googledocsforms_1

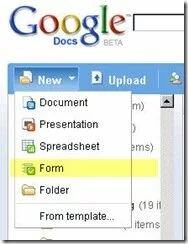
Go to http://docs.google.com and login with your Google username.  Select to Create a New Form.

A Form is a questionnaire page that can host a series of questions with various options to answer them.  Prepare questions beforehand and use the forms to design the questionnaire.


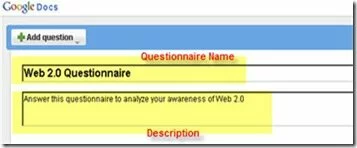
Give a Name for your form and also a Description for end users to identify the objective.

googledocsforms_2

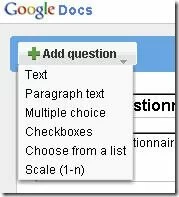
Then you can start adding questions using the Add Question button at the top.

While adding questions you can choose to make it mandatory and also choose from the following answer formats:

googledocsforms_3

Text and Paragraph Text can be useful for subjective questions.  Multiple Choice provides radio buttons and Checkboxes provide multiple options to choose from.  Scale can be used to rate a question and List can be used to provide a range of options.


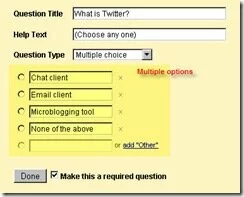
Following is an example on how a question with multiple choices can be created.

googledocsforms_4

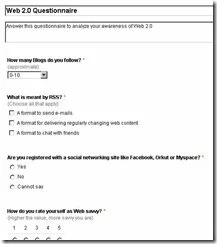
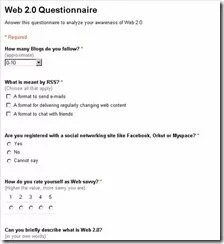
Here is how a sample Web Questionnaire form looks like.  You can easily rearrange questions by dragging and dropping them in appropriate locations.  Also Edit and Remove are highly intuitive.

googledocsforms_5

You can also Edit the Confirmation message that is displayed on form submit.  To do this, select More actions > Edit Confirmation on the right top corner.

Share the Questionnaire

Once created, you can share the questionnaire with users in one of the following ways.

  • Email the form by selecting Email this Form on the right top corner
  • Embed the form by selecting More actions > Embed and copying the HTML code on the required web page
  • Copy the URL of the Form from bottom of the page and sending it through Email or Chat

googledocsforms_6

googledocsforms_7

Following is how the Form looks when accessed using the URL.  Isn’t it so neat and intuitive?

googledocsforms_8

You can access the sample form I had created at this URL – http://spreadsheets.google.com/viewform?key=pUehfq3lTkylf0zRfaDT3QQ

Gather Results

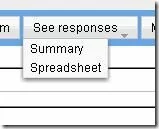
Once users start answering the questions, you can view the responses either as a Summary with detailed report represented using Charts or in a Spreadsheet.

googledocsforms_9

So you never have to manually gather responses and arrive at the results.

Thus, Google Docs Forms greatly simplifies Web Questionnaire creation, sharing and gathering results.  It is highly simple and very intuitive, even for non-geeks.

If you find this useful, consider sharing it with others using the Share This link below.

Subscribe for more such posts at Blogaroo today!

How to get a Daily Summary of your Overactive RSS feed?

An Overactive RSS feed (What is RSS?) like that of TechCrunch, delivers about 10 items everyday.  Consider 20 such RSS subscriptions and your RSS Reader can be cluttered in no time.  I am going to show you, how to get a Daily Summary of all posts from a RSS subscription.

Feedstomper is a utility developed by Jeremy Raines, that takes in the details of your RSS feed and provides an alternate feed that aggregates entries from the source RSS feed into a Daily summary.

feedstomp_1

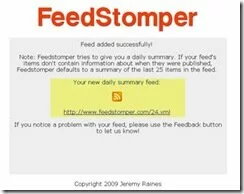
For instance, summarizing the RSS feed URL of TechCrunch, gives you the following alternate feed.

feedstomp_2

Now you can subscribe to this alternate feed in your RSS Reader and receive a Daily Summary of all posts from TechCrunch.

feedstomp_3

I suggest discretion in using this against all Overactive RSS feeds, as there can be a considerable time delay when the item reaches you.  This may not be suitable for News feeds, where the speed of item delivery matters.